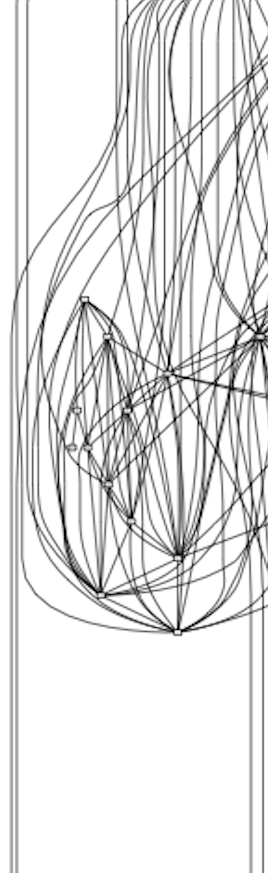
Correlation Networks of Frequent Word Stems, Varying Minimum Frequency and Correlation Threshold

Each image is a correlation network of frequent word stems from 18 chunks of English text: 10 from Twitter, 4 from news and 4 from blogs. Each node is a word stem that occurs at least lowfreq times across all chunks. Two nodes are joined when their counts across the 18 chunks have a correlation of at least corThreshold. The graphs were drawn with Rgraphviz.

Move the pointer over the image to change the parameters. Horizontal position sets corThreshold, from 0.840 to 0.910 in steps of 0.001. Vertical position sets lowfreq, from 7,500 to 8,500 in steps of 100. The sliders do the same, and either axis can be locked. The line below the image shows the current values, the number of nodes and edges, and the image file. There are 781 parameter combinations, which produce 553 distinct graphs.

lf 8500lowfreq ‚Üìlf 7500
Correlation plot for the selected lowfreq and corThreshold
ct 0.840corThreshold ‚Üíct 0.910
lowfreq
corThreshold

The graphs above use a steps of 0.001 for corThreshold, which skips most intermediate graphs. The strip below holds lowfreq fixed and shows every distinct graph in a narrower range.

These graphs come from a variant of the text cleaning that replaces every non-letter character with a space. That turns “don’t” into “don t”, so “don” becomes one of the 52 most frequent stems in place of “feel”. Here lowfreq is fixed at 8,228, the only value that gives 52 nodes. Moving the pointer from left to right raises corThreshold from 0.870 to 0.9105 and removes one edge per step, from 545 edges down to 458.

Correlation plot at lowfreq 8228 for the selected corThreshold
545 edges (ct 0.8700)corThreshold →458 edges (ct 0.9105)

Rebuilding the frustration_of_time correlation plot

The goal

In 2014, during the Coursera Data Science capstone, I made an error-prone word correlation network from the SwiftKey English text data and saved it as frustration_of_time.png because it looked pretty. And then I fixed the errors and moved on with the assignment. Only that low-resolution PNG survived. The goal of this project was to find the exact parameters that produced it, so the same plot could be regenerated as a vector image and printed at any size.

The plot is drawn by tm and Rgraphviz from a document-term matrix built from 18 text chunks (10 Twitter, 4 news, 4 blogs). Two parameters control what it shows:

  • lowfreq (lf) drops rare word stems. A stem becomes a node only if it appears at least lf times across all 18 chunks.
  • corThreshold (ct) drops weaker correlations. Two nodes are joined by an edge only if their counts across the chunks correlate at ct or higher.

The original has 52 nodes and somewhere around 460 to 520 edges.

What I looked for.

  1. Swept both parameters. cap_week2/corplot_multigraph.R walks a grid of lf and ct values, works out which cells produce identical graphs, and renders one SVG per distinct graph in parallel. The first sweep (lf 7500 to 8500, ct 0.840 to 0.910) produced 553 distinct graphs in about 90 seconds, in out/.
  2. Built a web scrubber to compare them. The images were converted to WebP and uploaded to WordPress, and web/scrubber.html lets you move the pointer over the image to scan through lf and ct, with sliders, axis locks and a live readout. Getting it to run inside WordPress took a separate build (web/scrubber_wordpress.html), because WordPress rewrites characters inside scripts.
  3. Narrowed it to 52 nodes. Only one set of 52 words exists, so lf was effectively settled and only ct mattered. The original grid had skipped most edge counts, so fine sweeps with a ct step of 0.00001 filled in every distinct 52-node graph (out_lf8000_fine/, out_lf8000_fine_low/). Many were close, but a chain of Twitter words in the lower right (good, love, great, today, follow, thank) always hung off the side, where the original has it tucked inside.
  4. Reproduced the 2014 text cleaning. The old notebook cap_week2/task_2.2.Rmd replaced every non-letter character with a space before building the matrix. cap_week2/build_checkpoint_2014clean.R rebuilds the matrix that way. It changes one of the 52 words: don replaces feel. That single word was enough to change the layout. The next section explains why.

Why “don” replaces “feel”

Stemming cuts words down to a common root so that different forms count as one word. “Feel”, “feels” and “feeling” all become feel; “really” becomes realli and “people” becomes peopl. The nodes in the plot are these stems, not whole words.

Before stemming, the text goes through several cleaning steps, and their order matters:

  1. Stopword removal deletes very common words like “the”, “and” and “is”. tm’s English stopword list includes contractions such as “don’t”, “can’t” and “isn’t”, spelled with the apostrophe.
  2. In the current cleaning, the apostrophe is still there when stopwords are removed, so “don’t” matches the list and disappears.
  3. In the 2014 cleaning, every character that isn’t a letter was first replaced with a space. The apostrophe in “don’t” became a space, leaving two words, “don” and “t”. Neither is on the stopword list, so neither is removed. “t” is later dropped for being shorter than 3 letters, but “don” survives as a word of its own.

“Don’t” is extremely common, especially in tweets, so this adds a lot of don. In the 2014-cleaned data don appears 14,167 times, which puts it well inside the most frequent words. In the current data it appears only 344 times, from other uses of the word.

Why it’s feel that drops out: the plot keeps the 52 most frequent stems. In the current data, feel is number 52, with 8,093 occurrences, just above the 53rd word. When don joins the top of the list, every word below it moves down one place, and feel becomes number 53 and falls off. The cutoff for 52 words rises from 8,000 to 8,228, which is why the 2014-cleaned graphs use lf 8228.

None of the candidates is a pixel-perfect match yet, but when that lower right tail tucks in, it was as close as I could get.

Diminishing returns

These were tested and didn’t get any closer to the original:

  • An older Graphviz. It turned out Rgraphviz has bundled Graphviz 2.28 since about 2012, so 2014 and today use the same layout engine.
  • Word order. All 52 stems are plain lowercase, so no locale or sorting rule could reorder them.
  • Plot size and device. Rendering at 10 inches, 12 inches, and the original’s 704 x 627 pixels, with both the Quartz and Cairo devices, changes the layout somewhat, but nothing came out closer than the 12-inch set.
  • More edges or fewer. Graphs from 425 to 580 edges, beyond the likely range.
  • Other cleaning variants. Keeping straight apostrophes, as a later notebook did, brings feel back. Keeping accented letters changes nothing.
  • The 2014 stemmer. SnowballC 0.5.1 produces exactly the same matrix as today’s version.
  • The 2014 tm. tm 0.6 installs but fails on R 4.6, so it was left there.

What’s still untested: how the 2014 notebook split the text into documents (the justthese/ folder no longer exists), and running the complete 2014 software stack (R 3.1, tm 0.6, Rgraphviz 2.10) in Docker. That is the likely path to a perfect match, and the most work.

Reproducing

  • Software used: R 4.6.1, tm 0.7.19, SnowballC 0.7.1, Rgraphviz 2.56.0 (bundled Graphviz 2.28.0).
  • The matrices (*.RData) are not in git. Rebuild them with cap_week2/task2_corrplot-corpus.Rmd (current cleaning) and Rscript cap_week2/build_checkpoint_2014clean.R from the project root (2014 cleaning).
  • Sweep the closest matches from cap_week2/:
    Rscript corplot_multigraph.R --checkpoint ../dtm_checkpoint_2014clean.RData --lf-min 8228 --lf-max 8228 --ct-min 0.870 --ct-max 0.9105 --ct-by 0.00001 --out ../out_2014clean
  • Run sweeps with Rscript from a terminal, not the RStudio console, because they fork worker processes.
  • WebP images are 800 px at quality 85. The *_wordpress.html files must be regenerated from the readable versions after any change.

a Cisco SD-WAN primer

The underlying concept of software-defined WAN is that a router’s management and control planes are abstracted from the hardware and reside in the cloud. That router abstraction allows a company to join multiple physical locations into a single network over redundant, low-cost, telecommunication links. The idea is that a router chassis is drawn apart and distributed across a distance — the I/O modules remain physically on-premises while the switch fabric is stretched over long distance media (via TCP/IP, MPLS, 4G/LTE, etc.) and the backplane is virtualized on cloud servers.

The software of a router can be viewed as having three component systems: 

1) The Data Plane refers to all the functions and processes that forward packets and frames from one interface to another — routed data. In SD-WAN, the data plane is tunneled between on-premises edge-routers. Cisco calls them vEdges (named for Viptella, an SD-WAN company that Cisco bought) or cEdges. 

2) The Control Plane refers to all the functions and processes that determine which path to use — routing data. in SD-WAN, the control plane is shared between edge-routers via cloud-based controllers. Cisco’s controllers are called vSmart, and Cisco SD-WAN also requires another cloud-based server called vBond for network discovery. 

3) The Management Plane refers to the configuration used to control and monitor devices. In SD-WAN, the management plane also resides in the cloud. Cisco’s management server is called vManage.

Updating VMware vCenter Server Appliance

Terminology

Baseline
A predefined or custom set of patches, extensions, or upgrades used to update an ESXi host or VM.

Dynamic vs Fixed
Dynamic baselines have selectable criteria for which patches are included.

Fixed baselines allow you to choose specific patches to include.

Attaching / Detaching
Baselines (or baseline groups) are attached to hosts (or clusters of hosts), and then you scan. What you’re attaching is actually just the metadata of the baseline.

Baseline Group
A bunch of baselines, or an aggregate of individual patch and upgrade baselines. An upgrade involves a release number change (e.g. vSphere 6.5 to 6.7). An smaller change uses a patch or update (e.g. vSphere 6.0 Update 1).

Scanning
The process of checking if the host(s) or VMs need any of the patches (etc.) in the baseline (or group).

Staging
The process of downloading the actual data of the patches ahead of remediating.

Remediating
The process of applying the patch, extension, or upgrade to an ESXi host or VM. The data will be downloaded if needed — if you didn’t stage the patches. So you need to attach, then scan, stage if you want, and then remediate.

Patch Metadata
Index files stored in the patch repository that list all known patches available for use by Update Manager.

Patch Repository
The directory on the Update Manager Server that holds the Patch Metadata as well as the patches.

Host Extension
Additional software to apply to a host.

VAMI
vCenter Server Appliance Management Interface.
vCenter Server Appliance is a VM that runs in ESXi and manages the entire vSphere environment, and you usually access it via its web UI. But it also has a separate web ui for managing itself, which is accessed at its URL on port 5480.
vsphere.company.com:5480

To update vCenter

(For example from build 6.7.0.10000 to 6.7.0.20000.)

Go to https://my.vmware.com/group/vmware/patch#search

Choose vc and download the latest patch.

In this case:

  • Release name:
  • VC-6.7.0-update01.Appliance-Patch
  • release date
  • 10.16.2018
  • File name:
  • VMware-vCenter-Server-Appliance-6.7.20000-10244745-patch-FP.iso
Then attach the iso to the Vcenter Appliance VM.
  • Actions > Edit Settings > CD/DVD drive > attach datastore or client device file.
Make a snapshot

just in case.

Check for Updates
  • Log into the VAMI as root:
  • https://:5480
  • Navigate to Update > Check Updates > Check CD-ROM + URL
  • Twirl down the selected update and click RUN PRE-UPDATE CHECKS
  • Click Stage only
  • Click INSTALL
  • You’ll need to make a small backup.

To make the backup

You can back up to a server via SCP, HTTPS, HTTPS, FTP, or FTPS (but not SFTP).
Enter the server address like so:
– protocol://:/path
– scp://backup.server.info:22/~
You’ll enter the user name and password separately.

vcenter backup

If you get this ERROR:

vcenter_backup_error

Log into vCenter via SSH as root.

$ ssh root@vsphere.company.com

VMware vCenter Server Appliance 6.7.0.10000

Type: vCenter Server with an embedded Platform Services Controller

Password:
Connected to service

* List APIs: "help api list"
* List Plugins: "help pi list"
* Launch BASH: "shell"

Command>

Enable a BASH shell:

Command> shell

Shell access is granted to root

root@vcenter [ ~ ]#

Check the status of vCenter services with:

  • service-control --status
root@vcenter [ ~ ]# service-control --status

Stopped:
vmcam vmware-imagebuilder vmware-mbcs vmware-netdumper vmware-postgres-archiver vmware-rbd-watchdog vmware-vcha vsan-dps
Running:
applmgmt lwsmd pschealth vmafdd vmcad vmdird vmdnsd vmonapi vmware-analytics vmware-cis-license vmware-cm vmware-content-library vmware-eam vmware-perfcharts vmware-pod vmware-rhttpproxy vmware-sca vmware-sps vmware-statsmonitor vmware-sts-idmd vmware-stsd vmware-updatemgr vmware-vapi-endpoint vmware-vmon vmware-vpostgres vmware-vpxd vmware-vpxd-svcs vmware-vsan-health vmware-vsm vsphere-client vsphere-ui
root@vsphere [ ~ ]#

Start the service with

  • service-control --start
root@vcenter [ ~ ]# service-control --start vmware-postgres-archiver
Operation not cancellable. Please wait for it to finish...
Performing start operation on service vmware-postgres-archiver...
Successfully started service vmware-postgres-archiver
root@vcenter [ ~ ]#

Add a DMARC record to your mail server.

DMARC is Domain-based Message Authentication Reporting and Conformance
DMARC uses SPF and DKIM to tell receiving email servers what to do (accept, reject, or quarantine) with messages that purport to be from your domain. It also reports to you.
DMARC is defined by a DNS record (TXT) and specifies:
  • An action policy for messages failing both SPF and DKIM. DMARC passes when either SPF or DKIM passes.
  • In Microsoft’s implementation of DMARC for incoming mail (which we don’t control), both SPF and DKIM must pass.
  • Allows for partial checking, e.g. 5 percent of mail.
To implement DMARC, you must first set up SPF and DKIM.
In Office 365, DMARC for incoming mail is done for you. But you must set up DMARC for your domain yourself.

SPF – Sender Policy Framework

SPF is a DNS record (TXT) that specifies which IP addresses are allowed to send mail on your domain’s behalf.
You need a single spf record for your domain, which will contain all the IP addresses that are allowed to send mail on your behalf.
Example record:

v=spf1 ip4:192.0.2.0/24 ip4:198.51.100.123 a -all

Example for Office 365:

v=spf1 include:spf.protection.outlook.com -all

Even if your domain doesn’t send mail, it is still vulnerable to spoofing and should have this SPF record:

v=spf1 -all

DKIM – DomainKeys Identified Mail

DKIM is a DNS record (TXT) that lets a domain associate its name with an email message by affixing a digital signature (using PKI) to it.
A valid signature guarantees that some parts of the email (possibly including attachments) have not been modified since the signature was affixed.
DKIM provides for two distinct operations, signing and verifying.
DKIM specification allows signers to choose which header fields they sign, but the From: field must always be signed.
You might need multiple DKIM records for your domain if you have different hosts, domains, or subdomains that you want to allow to send mail for you. Each host needs its own key specified in a separate TXT record, and each host is identified with a unique selector name.
Generate the keys with:

openssl genrsa -out private.key 2048
openssl rsa -in private.key -pubout -out public.key

Install the private key on the MTA/Email sending systems.
Publish the public key in the DKIM record with your registrar:
Example DKIM record:
  • type:  TXT
  • host:  selector1-dzsolutions-com._domainkey
  • Points to address or value:  v=DKIM1; k=rsa; p=<public_key>; n=1024,1453276987,1

DMARC

You want to ease into your DMARC policy to make sure it’s working correctly.
  • First, make a no-action policy (p=none;) that just collects reports. You’ll see who is sending mail on your behalf, and be able to correct for any senders you left out.
  • Second, switch to a low percentage quarantine policy (p=quarantine; pct=5;). It tells receiving servers to check only 5 percent of the mail, and if DMARC fails, send it to the spam folder. That way, most of the mail will go through no matter what, and your reports will show how well it’s working for the 5 percent. You can make adjustments until it works right.
  • Third, ease into rejecting (p=reject; pct=5;). Check your reports, adjust things, and increment up to 100%
no-action DMARC record:
  • Type:  TXT
  • Host: 
  • Value:  v=DMARC1; p=none; rua=mailto:admin@your_domain.com; ruf=mailto:admin@your_domain.com; sp=reject; ri:84600;
Where:
  • v is the version.
  • p is policy for handling pass/fail messages: none | quarantine | reject.
  • rua specifies where to send aggregate reports.
  • ruf specifies where to send forensic reports.
  • sp is the subdomain policy.
    If you have no subdomains for mail, it is best to reject.
  • ri is the time period for sending reports; default is 84600 seconds (24 hours).
Check your DMARC record at:
View the reports using https://dmarcian.com/ or https://mxtoolbox.com/domain/; they have validation tools for all DNS records.

Create your own What’s My IP service.

Here’s an easy way to make your own IP echoing service on your own website if you’re hosting that website with Apache on a Debian-based Linux distro.

  • 1. Add a new site to the apache configuration. The file should be named as the URL with `.conf` at the end:

nano /etc/apache2/sites-available/myip.stephenfranklin.info.conf

And it should look like this:

ServerAdmin stephen@stephenfranklin.info
ServerName myip.stephenfranklin.info
DocumentRoot /var/www/myip.stephenfranklin.info/htdocs
ErrorLog /var/www/myip.stephenfranklin.info/logs/error.log
CustomLog /var/www/myip.stephenfranklin.info/logs/access.log combined

  • 2. Enable the site and reload apache:

root@www:sites-available$ a2ensite myip.stephenfranklin.info.conf Enabling site myip.stephenfranklin.info. To activate the new configuration, you need to run: service apache2 reload root@www:sites-available$ service apache2 reload * Reloading web server apache2 * root@www:sites-available$
  • 3. Then create the appropriate directories for that site in `/var/www/`:

mkdir -p /var/www/myip.stephenfranklin.info/htdocs
mkdir /var/www/myip.stephenfranklin.info/logs/

Create an index.php script in the htdocs directory:

nano /var/www/myip.stephenfranklin.info/htdocs/index.php
And put this in there:


< ?php echo $_SERVER['REMOTE_ADDR']."\n"; ?>
  • 4. Test it from another machine with `curl`:

stephen@mac:~$ curl -s http://myip.stephenfranklin.info/ 191.145.122.55 stephen@mac:~$

That’s it! Try it out from a browser:
1_myip.stephenfranklin.info

/dev/xvda1 should be checked for errors

Amazon EC2 Ubuntu instances sometimes display this message to the terminal when you ssh in:

**** /dev/xvda1 should be checked for errors ****

/dev/xvda1 refers to the first partition of the hard drive (which is actually a virtualized hard drive running under Xen). This partition (likely, the only partition) contains your machine’s file system. To run a file system check, we like to use the fsck command. But this can only be used when the file system is not in use, so we’ll tell the system to run it upon reboot. And to do that we need to temporarily change two files: /etc/fstab (the file system table), and /etc/default/rcS (a small configuration file).

About fstab:

LABEL=cloudimg-rootfs / ext4 defaults,discard 0 0
/var/swap.1 swap swap defaults 0 0

The file system table (/etc/fstab) contains information that allows the machine to automatically mount disk partitions. That is, it prepares them for access by assigning them a location (mount point) on the file system tree. For the partition that contains the file system, the table assigns it to the root directory, which is designated by a forward slash / in the second field.

The first field in an fstab entry contains the device node, in this case by it’s file system label. If you look in /dev, you’ll see many devices, including the disk (“xvda”) and its partitions (“xvda1”). You’ll also see the \dev\disk directory, and if you look in there you’ll see that you can list devices by-label or by-UUID.

Enter
ls -l /dev/disk/by-label
and you’ll see something like:

lrwxrwxrwx 1 root root 11 Jul 25 21:15 cloudimg-rootfs -> ../../xvda1

which shows that the label cloudimg-rootfs is just a link to the device /dev/xvda1.

The last field (in the fstab entry, not the ‘ls -l output) is what we’re interested in changing here. It’s the “pass number” and indicates the order in which file system checks are done. “0” tells it not to run fsck, “1” tells it to run fsck on the root partition, and “2” tell it to check other partitions. We’re going to change it to “1”.

About rcS:

The /etc/default/rcS file contains six variables that change the behavior of various boot scripts. (The “rc” term, as in .bashrc and rc.local, has some history behind it and may stand for “run commands” or “run configuration,” or something like that.) The variable we’re interested in is FSCKFIX, which, when enabled with a “yes”, will tell fsck to always repair the file systems without asking for further permission.

The repair:

  1. Edit fstab:
    sudo vim /etc/fstab
    

    Look for the line describing the root (/) file system, and change the last ‘0’ to a ‘1’.

    LABEL=cloudimg-rootfs   /    ext4   defaults,discard    0 1
    /var/swap.1 swap swap defaults 0 0
    

    To do that with vim:
    a. Enter insert mode by hitting ‘i’.
    b. Exit insert mode with the ‘esc’ key.
    c. Save and exit by typing :wq.

  2. Edit rcS:
    sudo vim /etc/default/rcS
    

    Look for the line #FSCKFIX=no and under it type:

    FSCKFIX=yes
    
  3. Add in the /forcefsck trigger.
    sudo touch /forcefsck
    

    In the script /etc/init/mountall.conf, there’s a line which looks for the /forcefsck file, and upon finding it, will direct fsck to perform a full file system check.

  4. Reboot.
    sudo reboot
    
  5. Delete the line FSCKFIX=yes in the rcS file.
  6. Change the line in /etc/fstab back to a ‘0’.
    (The /forcefsck file was deleted for you by mountall.conf.)

Revert to old version of Google Chrome (OS X)

The latest version of Chrome (39) introduced some annoying behavior when revealing and hiding the top bar, so annoying that I wrote up a bug report, and decided to keep using the previous version (37). But I kept getting this warning when starting the application:

Your profile can not be used because it is from a newer version of Google Chrome. Some features may be unavailable. Please specify a different profile directory or use a newer version of Chrome.

And my search settings (for which I have a lot of nifty shortcuts) were vaporized every time.

Here’s how I solved that problem:

cd ~/Library/Application Support/Google/Chrome/Default
mv Web\ Data Web\ Data.old

The warning is gone, and upon signing in to Chrome, my search settings were restored.

Apple EarPods pin-out

Today I soldered a new jack onto my Apple EarPods. I have the EarPods with remote and mic. They’d been stretched and yanked too many times and were randomly pausing or advancing my podcasts. I bought a 50 peso knock-off pair (which worked but sounded like 50 peso earphones), and I cut off the jack. There are tear-downs online but they don’t mention the pin-out, so I had to work it out for myself. For future reference, here it is:

Pinout for the Apple EarPods with Remote and Mic
Tip – Left – Green
Ring1 – Right – Red
Ring2 – Ground – Green/Gold & Red/Gold & Red/Green*
Ring3 – Mic – Gold*

  • There’s a wire that has red and green strands wrapped around gold strands. Separate them. The red/green is ground. The gold is for the microphone.

(By gold, I mean the color of the insulation, not the metal.)